


About Chiming Quartz Clock Movements Tabs

Quartz Clock Movement Removal
This note explains quartz clock movement removal from the case. The following does not apply to quartz units made in Germany or inserts.
To remove the movement, you need access to the back of the clock and the front side of the clock dial. There are so many case designs it would not be possible to cover all of the different variations.
The clock case went to together so it comes apart. It may take a bit of probing but there is always a way to take it apart because it went together.
Getting access to the dial area
There are many case designs and styles and there is no way for us to know how the current specific clock went together. Most of the time the removal process is very easy but of course there are some instances where it is not user friendly.
Thus, it is on the users end to be able to access the dial and movement area to continue with the swap out.
Clock hand removal
Quartz clock movement removal always needs the hands to come off first. There are two reasons for this.
First, need to have access to the hardware that mounts the movement. Second, there is no way to take get the movement out of the clock if the hands are still on it. They certainly will not fit through the hole in the clock.
Quartz Clock Movement Removal - Minute hand
Quartz clock movements have two styles of minute hands. One style has a nut that holds it in place and the other style is a friction fit.
The friction fit has no nut and just pulls off with a twist and pull. The second style has a minute hand nut to secure the minute hand. Removal is done by turning the nut to the left with needle nose pliers. Once the nut is loose it only requires fingers to unscrew it.
Hour hand
In a Quartz clock Movement removal task, the hour hand is only a friction fit. Thus, the hour tube tapers down on the movement, meaning it is wider on the low end of it.
This makes the hour hand friction fit only. Just twist the hand and pull it until it comes off.
Second hand
The second hand pulls straight up and off if the clock has one.
Chime Quartz Movement Installation
The following is the basic installation for a chiming quartz movements from Clockworks. However, each unit is varied with the chime functions and speaker style. Therefore, the individual instructions need to be read for this information.
Installation sequence
Installation of the chime quartz clock movements is done in the following sequence.
1. Hanger and rubber washer
Hanger goes on the new movement first if there is one, and then the rubber washer. Both go over the post that sticks out the front of the movement. The separate hanger is how the QU22 is shipped, where as the QU30 has it molded as part of the movement, and QU40 does not get one.
2. Installation of the chime movement
The post goes through the back of the dial toward the front. Install the brass washer and hex nut on next to secure the movement to the back of the clock dial. A clock dial is the part with the hands and numbers on it and is also called a clock face. Know the names of the parts is always helpful in completing a quartz movement installation.
3. Hour hand
The hour hand goes on as a friction fit. All it needs is just a twist and push motion.
4. Minute hand
The minute hand has an oblong hole and mounts onto the oblong shaft at the end of the unit. Therefore, the minute hand needs the nut to secure it.
5. Second hand
Additionally, if there is a second hand this goes on just by a friction fit and this would be last. Use fingers to push it onto the pin that is in the center of the post.
6. Finishing up
In conclusion, to complete the chime quartz movement installation, turn the minute hand to make it chime and strike out the hours. Point the hour hand to whatever hour it rang out. Take the minute hand off the clock and reinstall to point close to the 12.
7. If the chime is not on time
Given these points, if the minute hand will not point exactly on the top of the hour, here is the correction. Locate the circle hand setting knob on the back of the movement. Hold knob still this still with fingers while turning the minute hand to the top of the hour. Next time it will point right at the 12 mark when it chimes. This is the end of the chime quartz movement installations.

Quartz clock movement measuring
Please select the post length when ordering a new quartz clock movement. Of course, when doing quartz clock movement measuring, remember the post will need to be able to go through the thickness of the dial face.
Also remember that the dial may or may not have a wood backing to it. With a wood backing the clock dial or face would be thicker and thus would need a longer post.
Clockworks offers multiple post lengths on quartz clock movements for this reason. In other words, the post has to be long enough to go through whatever thickness we are calling the dial.
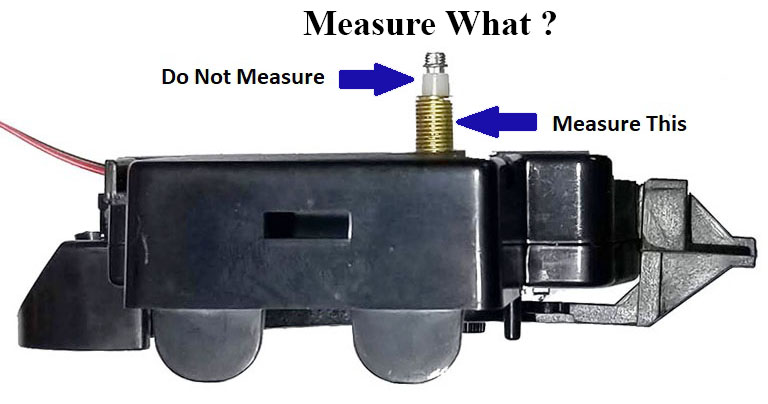
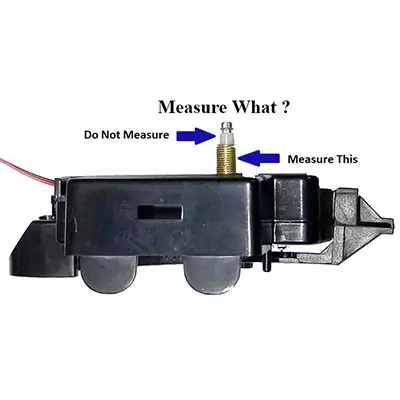
What to measure
Clockworks offers multiple post lengths for quartz movements. When completing a quartz clock movement measurement, you will need to measure the post on the old movement.
This is so it can match up with the new quartz movement. To clarify, the post is the part that goes through the dial (face) and mounts from the front and what is in a quartz clock movement measurement.
This applies to all Clockworks quartz movements, including chiming quartz, and time only quartz movements.
Length depends on dial thickness
When working on a quartz clock movement measurement the post has to be long enough to go through whatever thickness that the clock face/dial, might be. The length of the threaded portion of the post/shaft, is the measurement that you need.
The shaft with the threads needs to go through the dial/face of the clock from the back to the front. It needs to be long enough for a small hex nut to screw onto it. It can’t be too long or the hands will not move correctly.
Clockworks has a variety of quartz clock movement lengths to accommodate a variety of different materials since some are wood and some are metal and some are plastic, etc.
Measuring quartz post lengths
Above all, when replacing a quartz movement it means measuring quartz post lengths. Subsequently, the post will stick out through the front of the clock dial.
Of course, there needs to be enough threads sticking out for the hex nut to be put on. Hence, the movement will be held in place to the back of the dial (clock face) and will not move. Sometimes if the clock has glass over the face it is possible for the post to hit it.
Therefore it is important to measure the quartz post length correctly. In other words, if the post hits the glass, the hands will not be able to move. Thus making the clock not work.
Use the chart if building a clock
With that being said, find the correct quartz post length by using the chart below. So remember, the threads on the post need to be at least 2/16 longer than the thickness of the clock dial.
To clarify, a clock dial is the face (also known as the thing with the numbers on it). As always, email us if there is any question.
Measuring quartz post lengths if replacing a clock
If replacing a movement and not building a clock, it is easier to measure the quartz post length of the old movement.
Before measuring, remove the movement first by taking off the hands and then the hex nut. Next, measure the length of the post that has the threads that the hex nut was on.
In short, only measure the fat part of the hand shaft that we call a post. Also, never include the part that the hands go on when measuring the post length. All in all, the new unit needs to be the same post length as the old movement.
Overall, this applies to all quartz clock movements available on Clockworks such as chiming quartz and time only quartz.
Dial Thickness
- 1/16 inch thick
- 3/16 inch thick
- 5/16 inch thick
- 9/16 inch thick
- 3/4 inch thick
Size Post Needed
- 3/16"
- 5/16"
- 7/16"
- 11/16"
- 15/16"
Quartz-Battery Clock Movement Definitions
Of course, can easily replace a movement by familiarizing with these simple terms and words. These Quartz clock movement definitions are the most common phrases and meanings related to the The clock face that the battery movement post will go through is a dial. This is the face of the clock with the numbers on it. Dials are available in two styles, Arabic (regular) numbers, or Roman (XII for 12) numbers. Dials also come in many shapes and sizes. Larger dials may require a High Torque clock movement instead of a Low Torque unit. A High Torque unit is mandatory when the dial is over 10 inches wide. This is measurement is from outside the 9 directly across the face to outside the numeral 3. This is the time track diameter. The post is the part that has the threads that mount the movement to the back of the dial with a hex nut on the front. They all come 5/16 wide, except for the QU22 unit. The QU22 has a 7/16 wide post, unlike the rest of the quartz units. The lengths are variable and are chosen upon ordering the clock movement. A six sided nut, this is the nut that attaches to the post threads that go through the dial from the back to the front. It secures the movement to the back of the clock dial. This should be tightened enough so the movement will not turn if the clock case gets moved.
Dial =

Post =
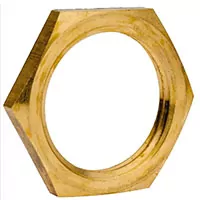
Hex Nut =
Hanger =
Included, but optional in use, is the steel part that allows the clock to hang on the wall. This slips over the post with the threads before the movement mounts to the back of the dial. Therefore would have the hanger at the top of the movement and will allow it to be hung on the wall. Usually made of steel, they are sometimes aluminum. All of the time only quartz clock movements will come with this hanger, but not all of the pendulum units.

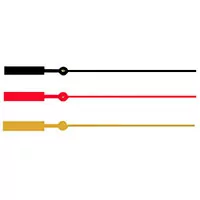
Quartz Clock Movement Definitions - Hands
Sometimes called pointers, needles, arms or hands, these are the things that point to the time. In short, the hour and minute indicators that tell what time it is. Therefore, to order the clock hands, measure the length of the minute hand. Measure from the center of the mounting hole to the end of the minute hand. Similarly, the hour hand is proportionally smaller and comes with the minute hand as a set. Moreover, the minute hands we sell for the quartz units have an oblong mounting hole and the hour hand has a round hole. This is known as the American standard "I" shaft style. Comparatively, China uses a different style. Their style has a round mounting hole in both the hour and the minute hand. All of our American style quartz clock hands fit all the quartz clock movements we sell. They are the standard "I" shaft as described.
Quartz Clock Movement Definitions - Second Hands
The optional skinny pointer that ticks out the seconds. The mount on the quartz second hands are just a press and friction fit. There is a post that sticks out of the backside to mount it. This tube fits over a pin that is inside of the quartz clock movement hand shaft post. Thus, the second hand post fits down into the end of the hand shaft and mounts via friction fit. There are two styles of time only quartz clock movements, step motion and continuous sweep motion. So the step unit will run this second hand in a jumpy one second interval. Then the continuous sweep movement runs the second hand in a fine, constant scrolling sweep motion around the dial instead.
Quartz-Pendulum Hits Sides of Clock-Case
Hearing a bonk, bonk, bonk all day and night? This is because the Quartz-pendulum hits the sides of clock-case with each swing of the bob. It may not stop the clock, the clock might work just fine, however the knocking sound of the pendulum hitting the sides of the clock case can be annoying. Lucky for us the correction is fairly simple on these pendulum quartz clock movements.
Why a quartz pendulum hits the sides
In essence, there are only two reason that this might happen. Certainly, the most common reason is the size of the bob. The bob may be too large for the case. Another less likely reason is that the magnet on the movement is too strong. Both of these problems are an easy fix.
The correction
There are two easy fixes for this. The pendulum bob can be swapped out for a smaller sized bob. Therefore the bob never reaching the sides of the case. Or lessen the strength of the magnet on the back of the movement itself by using tape. I have heard of this being done with masking tape with good results. The masking tape creates a slight barrier to lesson the magnetic pull enough to reduce the swing of the pendulum. Therefore the pendulum swing will be less and not hit the sides. Either fix will work, making the clock will again be quiet.
↑ Back to top
Shop By Brand

Shop Hermle
Find the perfect Hermle movement for your clock.
Howard Miller
Find the perfect Howard Miller movement for your clock.
Shop Kieninger
Find the perfect Kieninger movement for your clock.
Seth Thomas
Find the perfect Seth Thomas movement for your clock.
Shop Urgos
Find the perfect Urgos movement for your clock.
Perfect, now I can install my movement with no problem, thanks for the installation notes.
I now know eaxactly how to do the measuring, thanks.
I wound the weight on the LEFT(chime) to tight and stopped the clock. What do i do to free it up ?
Grandfather Clock Weights Stuck
The Grandfather clock weights can get stuck in the high position if over wound. Some larger clocks have over wind protection to prevent this. The grandmother and grandfather chain drive units often do not have this feature. When winding the weights up make sure the top of the weight can be seen when done. Never go to the point where the top of the shiny weight cover cant be seen.
Chime weight stuck
The chime weight is on the right as you face the clock and has the heaviest weight .
Using cloth gloves, or at least a cloth of some kind, pull down on the weight some. This is the same as making the weight weigh more. At the same time, turn the minute hand past the quarter hour to see if it will engage the chime. When you advance the time and make it chime, the weight will slowly come down. This will hopefully be enough to activate and run the chime on its own.
Time weight stuck
The time weight is the center weight which can be light or heavy depending on bob size. This is the hardest weight to deal with out of the three. Try pulling down some while swinging the pendulum .
See if it starts running on its own when letting go. If this does not work, take off the pendulum. All it will have is the pendulum leader hanging on the back of the movement.
This will make it tick tock faster than if the pendulum was on. The leader will tick tock faster as you pull down some on the weight. The weight will then come down enough to run the clock. If all else fails, and it’s a chain driven clock, you would need to cut the chain in half, or break a link, to take the movement out of the clock. With the movement out of the clock it can be fixed.
Strike weight stuck
The strike weight is on the left as you face the clock and has the lightest weight. Only after the chime weight is operating correctly can you work on the strike weight.
If the clock does not run through the chime sequence it will not get to where it strikes out the hours. With some cloth gloves on, or at least a cloth of some kind, pull down on the weight some.
Again, this is the same as making the weight weigh more. Doing this will make the clock strike. Advance the minute hand and let it chime each quarter until it plays the top of the hour song. Then pull a little on the weight when it’s supposed to strike out the hours. Keep advancing the time with the minute hand, as to make it chime and strike. Then slowly the weight will come down enough to be able to activate and run the strike on its own.
*The content of this website is copyright by Clockworks and written by James Stoudenmire