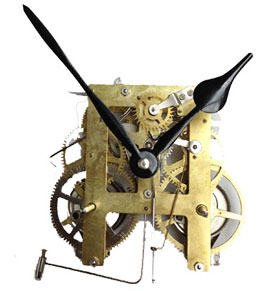
In many cases the complaint with a mechanical clock is that it stopped working after it was moved. This is usually from someone moving the clock without taking the pendulum off and this puts the clock out of beat. Out of beat is a term used in clock repair that basically means the clock is going tock-tick, tock-tick, or ticktock, ticktock instead of tick tock tick tock. It is sometimes corrected by putting a matchbook or Small piece of wood under one side of the clock case to make the tick and the tock evenly spaced. This can temporarily correct the problem and the clock runs fine. This method however is not as good as correcting the beat and having the clock run when it is truly straight and level. This can be achieved on most clocks by slightly bending the verge one way or another. The verge is the only movement part that touches the pendulum and whacks the pendulum back and forth. The verge is what gets bent or pushed when the clock is moved, without taking the pendulum off the clock. A verge that is pushed or bent effects the escapement of the clock; the escapement being that part of the clock that actually creates the tick and tock sound.
By bending or pushing this verge back into position, and then listening to the sound, you can make the clock go tick tock, tick tock rather than tock tick, tock tick or ticktock ticktock which means the clock is in beat. This method is the same for most mantle clocks, kitchen clocks, grandmother clocks, and grandfather clocks. Just about all pendulum clocks are this way except for the 400 Day clock or the Atmos, which are entirely different timepieces.
If the clock is now in beat, meaning the tick and the tock are evenly spaced, but then the clock stops after awhile, what now? Here are some other common ailments that are meant to be looked into before going into a cleaning procedure. Are the hands touching the dial, or each other? Bend the hands so they do not touch. Is the pendulum touching another object during its swing? The Weight Driven Clocks pendulum cannot touch anything during its swing. It is commonly found in mantle clocks that the wrong pendulum bob has been put on the clock. Bobs are lost frequently like clock keys. If someone decides to replace the bob but hooks on a fatter one then the original, it may bump into the movement during its swing, even though the clock is level. Being off level is the most common reason for the pendulum to be blocked during its swing. If a clock is not level side to side and front to back, (or close) the bob may hit the case. It depends on the clock. All clocks are meant to be level and in beat from side to side, but not all clocks are meant to be perfectly level from front to back. The point is, to keep the pendulum totally free from obstructions because it uses its own weight and momentum to help keep the clock running. If it bumps anything, even slightly, then it loses some momentum and the clock will eventually stop. If these things do not fix the clock then it would be safe to assume there is a general lack of power in the time train. It is time to give the Spring Driven Clocks clock a good cleaning and check it over for excessive wear. If the old oil dried up, then this would cause too much friction for the clock to run with the weights power. Clean out the old oil and check for excessive wear at the pivot holes. Pivot holes are explained in another section. To get to this point means it is time to look for a New Spring Driven Clocks Movement. Unless you find clocks as interesting as I do, then the time required to overhaul the movement is not worth it when you can get a New Movement, improved by the factory with bronze bushings, which will be more cost effective. It can be much more expensive to overhaul a movement because of the extensive time it takes to disassemble the movement, work on it, and then put it all back together again. Forget about the movement being sentimental when it comes to replacing it, keep the case sentimental, not the Weight Driven Clocks movement. If the movement is on our charts, then it is best to replace it.
If you do not hear any tick tock from a Spring Driven Clocks mechanical clock, even if the verge is moved back and forth by hand, this means there is a big obstruction in the way of the mechanics of the movement. This could mean any of the following:
1. The hands are touching something, bend the hands to freedom.
2. The Spring Driven Clocks chiming mechanics are out of synchronization and they are doing something to stop the movement. If the chime mechanics seems to be your clocks situation, it is recommended to read up on these parts with our E-Book.
NOTE:
There are only two general methods that a Spring Driven Clocks synchronizes the chime with what hour it is, these two methods are called Rack and Snail or Count Wheel. Both of these involve many interactions between the arms inside the movement (The arms are in the front of the movement in a rack and snail style movement).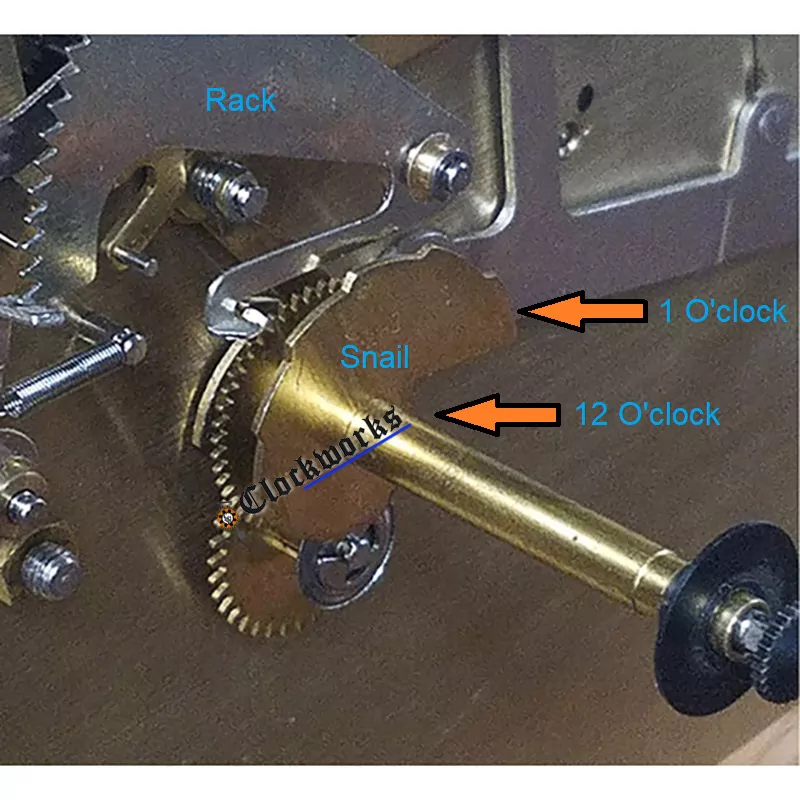 Rack and Snail movement
3. The weight chain or cable is pinched or hung up somewhere. This can happen during the installation of a Spring Driven Clocks movement to its case. See if the chain or cable is rubbing anything or getting pinched anywhere.
To purchase mainsprings through us, you'll need the following information: the width in mm, the thickness in mm, and the approximate length in inches of the existing spring. Then determine if the mainspring is a hole end or a loop end. It is easy to tell what style a mainspring is. Some mainsprings have a cover around them, and these covers are called barrels. Mainsprings that are in barrels are always hole end mainsprings. Loop end mainsprings are the type that are visible from the back of the clock and they have a loop at the end of them. This loop goes around the pillars that hold the movement together. For this reason, a clock with a broken loop end mainspring must come completely apart to replace the spring. Replacing Spring Driven Clocks mainsprings involves letting the power out of any other mainsprings in the movement, so they won't fly out of control and damage you or the rest of the clock. This is done with a mainspring let down tool. Do not attempt to use the clock key, this could cause an injury. As the power is being released from the spring, it is desired to keep the mainspring small and harmless, so the power of the spring is released into a mainspring clamp with a mainspring let down tool. One of these clamps goes over the mainspring after you wind the clock up, then the power of the spring is released slowly until the spring is harmless in the clamp. Mainsprings are serious business, they pack a punch, so please do not take them too lightly and end up getting smacked by one. If you use these tools as suggested you will be fine and have nothing to worry about. As far as the mainsprings in the barrels go, they sometimes can be removed from the clock without taking the movement completely apart, but it still needs the power released first. After the barrel is in your hand, with the mainspring inside, it is time to take the cap off the barrel. The cap is the only part of the barrel that comes off, so it is pretty easy to find. Pop off the cap off with an appropriately sized screwdriver inserted into the slot provided and you will see the broken mainspring. The arbor that connects to the center of the spring is only connected by a nub hooked inside the hole at the beginning of the mainspring. Just turn the arbor the opposite way of the spring winding direction, and you will see the nub pop out of the mainspring hole. The arbor will be loose and able to come right out of the barrel. Now all you have is a barrel with a broken spring in it. I have used this method when a winder is not available to remove an old spring: I hold the barrel tight with a towel wrapped around it, with only a small opening in the towel to get a pair of needle nose pliers to the mainspring. I hold the entire operation as far from my body as possible, then yank the spring out with the pliers. Of course the spring goes wild when this is done and it's moderately dangerous. I have never gotten injured doing this and hope you won't either. Just take control of handling mainsprings with precaution and confidence, and you will find that they are an easy obstacle to conquer. Oh, by the way, I am not liable for anything and you are at your own risk. Sound encouraging? If you do not like this style of removing a mainspring from a barrel, we offer various books with other techniques. We also offer the hole end mainspring winder / unwinder. To put the new spring into a barrel is tricky depending on the size of the mainspring. The bigger the mainspring the harder it is to get into the barrel without a winder. It is important to be sure the mainspring is going in the proper direction. You can usually tell by the direction of the nub on the center arbor. It only locks in one direction. A small mainspring you can just cut the wire that comes wrapped around the spring so it is expanded. Then you would lock in the hole in the outer end of the spring into the nub of the mainspring barrel wall, and work around and around the spring into the barrel until the center coil snaps in. Of course if it is a big spring it would be very difficult and dangerous to do this. If this is the case send the barrel and spring into Clockworks and we will put it in for a fee and send it back to you. The cap of the barrel can be put back on easily with a vise. Start putting the cap on the barrel with your fingers until it wants to go in, but needs that 'snap' to get it into place. Just apply just enough pressure to see it snap into place. Give the movement a visual check over to see if anything was damaged due to the mainspring breaking. It is quite an impact on the clock when a mainspring lets loose and it is good to check the following: See if the click, the part that keeps the mainspring winding in only one direction, is okay and not too loose; check if there are any bent gears; and see if there are any bent pivots. Pivots are the part of the gear arbor that stick through the plate of the clock. It is really an arbor, but the skinny end of the arbor that sticks throughout the plate is called a pivot in clock world. If these get bent, then it will create too much resistance in the Spring Driven Clocks gear train to let the clock run.
This section is for the clock that chimes at the wrong time, or chimes the wrong amount on the hour. This usually happens when the clock is laid down on its back and then later put back upright and attempted to run again. It is easy to fix.
NOTE:
Understand these two points first before proceeding: Some clocks do not like it when the minute hand is turned counter clockwise, so for the beginners, just go by the rule that all clocks should only go clockwise with the minute hand and you will be safe. In fact most clocks you can go backwards just fine, they are designed like this so it is okay, but to be safe for the sake of the few that can not go backward, go forward only. Also understand this one other point; on just about all clocks, with the exception being newer Japanese clocks and 31 day clocks, the hour hand is only a friction fit and can be turned on the hour tube to any position on the dial, backward or forward. If the hour hand becomes loose during this, just push back on its tube and it will be tight again. Now that you understand those two points, to move the minute hand forward only and the hour hand is usually only pressed on being a friction fit, we can continue setting the clock chime. To correct a Spring Driven Clocks mantle or wall clock that is bonging the hour when the minute hand gets to 6 o'clock instead of 12 o'clock, just count the bongs, take off the minute hand and reinstall it on the clock pointing to 12 o'clock, then turn the hour hand to the hour you heard the clock bong and its done. To correct a clock that is bonging the wrong hour on the hour, just turn the hour hand to the correct hour the clock bonged, then reset the time correctly with the minute hand letting it bong as you go. Your done! This section is for Westminster or other 15 Minute melodies not chiming the hour, on the hour. If the clock is chiming prematurely only about 5 minutes or so before it is supposed to chime, on most clocks you can just take off the minute hand and turn the bushing that is in the center of the hand one way or another so it is exactly on the hour when it bongs its melodies. If the clock chimes the first quarter when it is supposed to be chiming the hour or something similar, just remove the hands and put them to the time that it is bonging.
NOTE:
On many quarter chime clocks, they have a self correcting feature and you should wait until a couple of hours go by after setting up the clock, to see if it will correct itself. There is a short cut to this, simply go around once or twice with the minute hand, letting it bong as you go. If a hour or two has gone by and the clock is still singing the wrong song at the wrong time, then remove the hands as stated earlier and put them to what ever time the clock is bonging, then reset the time with the minute hand. Cleaning without disassembly is not as effective as breaking down the movement, but it is sufficient in most cases. Not everyone is ready to break down their Spring Driven Clocks movement and put it back together. We offer a Basic Clock Cleaning Kit that is for the person who would like to do a simple clock cleaning without having to learn an intense amount of clock repair. The goal to cleaning a clock movement is to remove old oil that has solidified and put new oil in its place. Solidified clock oil creates wear to the movements outer plates and eventually causes too much friction for the Spring Driven Clocks to run.
Disassembling and reassembling a movement for a cleaning is a job that takes patience and some time to learn how the Spring Driven Clocks movement operates. If these are not things you wish to invest, it is best to get a New Movement from our charts that would fit your dial, pendulum, weights and chime rods, they are usually in stock and ready to ship. If you are willing to learn how your Hermle operates, and would like to clean and repair the clock yourself, it is best to start out with the simple kit we have put together for this purpose. It includes The Clock Repair E-Book that guides you through each step of this process and explains the striking components so you can reassemble the movement and have it strike correctly. You need the E-Book to assemble a striking movement. This E-Book is included in the Basic Clock Cleaning Kit. You get the clock cleaning solution, the E-Book, a brush, a clock level, clock oil and a vision visor. The E-Book explains what to do with these items. There you have your options, get the Basic Clock Cleaning Kit and start reading up on how to clean and oil your clock movement, or just replace it with a brand New Movement. You can start with seeing if the Spring Driven Clocks movement is available, and if it is then try the clock cleaning kit and see if you can get it to work on your own before making the new movement purchase.