Slim Grandmother Clock Kit
This quality grandmother clock kit has a Westminster chime movement that it progressively at the quarter hours. Then it will strike out the hourly count when its done with the chime. It includes a phase of the moon dial, and a chime silence switch.
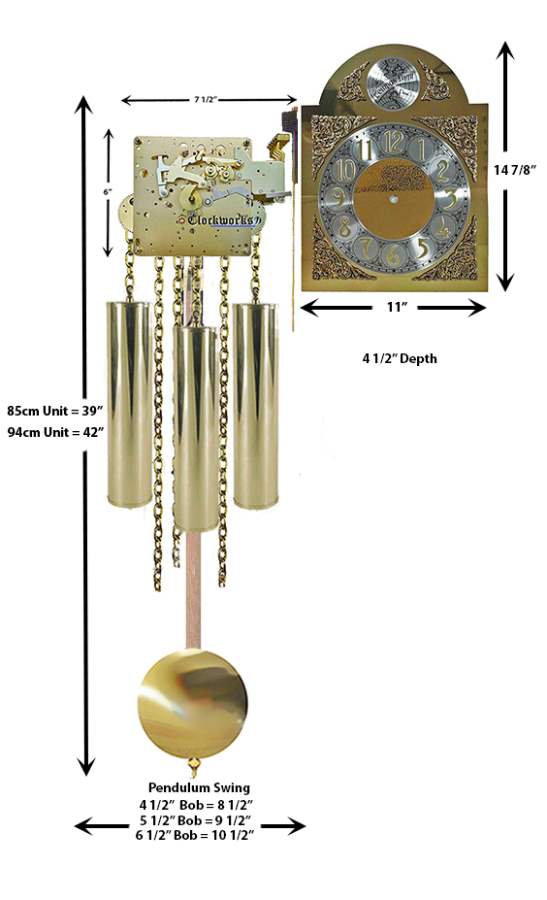
This is a nice size that will work with a Grandmother clock case where there is not much depth. The side strike hammers really reduces the minimum depth requirement needed. The clock case would need to be able to except the movements minimum space requirements as indicated on the picture.
The Pendulum Length Options
The length of the pendulum comes in a few options. The Germans measure the pendulum length from the top of the movement and all the way down to the bottom of the pendulums rating nut threads. So this measurement is the pendulum itself from tip to tip off of the clock, the leader it hangs on, and the suspension that the leader hangs on. All three components in centimeters make up that CM length in the drop down menu.
If you want to know how long the actual pendulum is, subtract 15CM from the options with the pendulum length. This will exclude the leader and suspension, and be the actual pendulum length from tip to tip off of the clock. This length can vary as if a larger pendulum bob is selected, the actual length of the pendulum gets longer. Why the CM length matters at all is because if the pendulum length is not near the CM length of the movement, the clock will not keep time. So the gearing in the movement and the pendulum length works together to keep time around the specified CM length.
The bob width Options
The "Bob" is the round disc at the bottom of the pendulum, it can be a variety of widths. To select the width of the bob, you need to first measure how wide the waist of the clock is. The bob size selected should have at least two inches on each side to swing back and forth.
Assistance = 800-381-7458
- Westminster
- Chain Driven
- Tempus Fugit Dial
- Side 5 Rod Strike
- Made in Germany
- 2-year warranty
Listen to Westminster
Components are installed in this order
1. Chimeblock
Chimeblock Description
The chimeblock will mount to the back of the clock case by the included hardware. It has 5 premounted, pretuned chime rods and an overall length of about 10 inches if measured through the block.
Chimeblock Installation
Mounting the chimeblock on a side strike is usually done with a simple wood board. The chime block will bolt to a board that gets mounted someway in the clock case so it will be at the left side of the movement where the hammers will hit the rods.
The hammers should each hit a rod and can be fine tuned by hand. The way this is done is by using your fingers bend the hammer wire so the hammers head is about 1/8 of an inch from there chime rod. This is where the hammer head will not thud or double hit. If you bend each hammer with the fingers until you get a nice crisp note down the line, the chime melody will be perfect. The top of the hammer heads should be about 1/4 or 1/2 inch down from the block itself.
2. Movement
Movement Description
The chain driven Westminster movement will run 8 days on a single wind up. It comes factory oiled and ready for installation. It includes its chains, mounting screws and washers, the leader, the suspension spring, hand nut and moon dial gear. It has two square shaped outer plates made of brass with the puzzle of gearing between them, and then it has the hammers on the back, 4 on one side for the chime and 4 on the other for the strike.
Movement Installation
The movement will need a seat board to mount on. A seat board can consist of only two parallel board strips that are approximately 2 x 2 square. These two boards run along the bottom of the hood of the case, spaced about 1 inch apart. The front plate of the movement sits on one board while the back plate sits on the other. The chains drop down between the boards to suspend the movement in the air where everything else will dangle from it. The movement is secured from underneath with the included two screws and rectangle washers. The washers are rectangle as it will clamp each seat board while the screw goes up to the movements bottom pillar post's threaded hole.
3. Dial
Dial Description
Includes a Tempus Fugit style dial that is 11 x 14 7/8. The silver and brass tone dial has raised numerals.
Dial Installation
The first thing to do is install the selector switch to turn off the chimes to the clock. Find the small steel arm that is about 1 1/2 inches in length with a set screw. This will go on the arm coming out of the clock movements right hand side. That is to say, your right as you face the front of the clock movement there is an arm sticking out the movement. The selector arm gets put on by sliding over that larger arm and secured with the set screw. It may or may not already be mounted on the movement, but if it is not, it only needs to be able to come through the slot at 3 o'clock. This will enable the customer to change the chime to silent.
Mounting the dial is easy as it only has to be attached to the wood case. The usual way this is done is drilling four pilot holes in the corners of the dial and use some small brass screws to secure it.
4. Hour and Minute Hands
Hands Description
Black Serpentine style hour and minute hands sized for the dial diameter.
Hand Installation
The hour hand has a round hole and is only a friction fit onto the post. It will be able to move forward or backward to adjust the time. The minute hand has a 2mm square hole in the rotatable mounting bushing. The minute hand is secured with the included minute hand nut. If the clock ends up chiming at other times than the quarters, do the following. Take the minute hand off of the clock, this is the longer of the two hands. With this minute hand off of the clock, turn it upside down, you will see it has a square hole where it attaches to the clock. Well this square hole is in a bushing that will rotate WITHIN the minute hand itself. So just use needle nose pliers to turn this bushing so the square in the bushing rotates. Then put the hand back on the clock and see if it is pointing to the correct place where it chimed. Then set to time.
6. Pendulum
Pendulum Description
The wood stick pendulum will come unstained so it can be stained like the case on the customers end. It is a simple design that is good for the rustic antique style look.
Pendulum Installation
The wood stick style pendulum will include the bob included separate in the packaging. The bob will need to be mounted to the bottom of the sticks rating nut threads, with the nut on the threads to secure it. This is called the rating assembly and it holds the pendulum bob on and is used to adjust the time keeping of the clock. If you turn the nut at the bottom as to raise the pendulum bob a little, this will speed up time. Reverse for slowing of time.
After the movement is in, its only a matter of hanging the pendulum on its leader. The term leader is that pendulum hanger on the back of the movement that swings back and forth. Be gentle with the pendulum and leader, no violent moves, just hang it on there and then stop the pendulum from wobbling around.
7. Weights
Weights Description
The kit includes three polished brass tone weights that are 47mm in diameter. The weights are shipped complete with fillers already assembled. Please note, these are tricky to ship as upon shifting back and forth sometimes the end caps get slightly damaged or concave. If this is the situation just let us know and we will ship out new end caps free of charge.
Weight Installation
Do not touch the weights with your bare hands as you can discolor them. It is best to use gloves or a rag to handle them. These weights may or may not all weigh the same, usually they do not. If they do not, the heaviest weight goes on your right as you face the clock. Out of the two that are left, if there is one lighter weight, this will go on your left as you face the clock. The reason for the inconsistency of the weight specifications is due to factors such as pendulum bob diameter and also the weights function. To hang the weights on is easy, there are three chains with the clock that loop over there sprockets in the movement. Just hang the weight on the side of the chain that has the hook on it, and then stop it from wobbling around.