


Mechanical Wall Clock Kit WMKIT1
$600.00
Westminster Spring Driven Kit
Westminster spring driven kit’s minimum case requirements are 4″ deep, 8″ wide, 18 1/2″ tall with the dial. In addition, this German made clock movement has a 45cm (17 3/4″) pendulum length from the TOP of the movement and down.
$600.00
SKU: WMKIT1
Categories: All Products, Clock Movements, Mechanical Movements, Mechanical Clock Kits, Spring Driven Movements, Wall or Mantle Clock Kits
Ships From: USA
Sold By: Clockworks Inc.
Returns: 30-day return policy
Secure Payment: Shop with confidence
Mechanical Clock-Kits on this page are for the clock case maker or to set up all new insides to a currently existing clock, from Clockworks Inc.
Please view these information tabs for Building German Wall-Mantle Clock-Kit Instructions.
Mechanical Clock Kit Styles Available
Mechanical Clock Kit Styles Available include wall clocks, mantle (shelf) clocks, and floor clocks. Floor models includes the granddaughter, grandmother, and grandfather series. Mechanical Clock Kit Styles are in the list below.
Mantle Clocks
Mantle clock kits are always spring driven and wound with a clock key. Moreover, it can come in a variety of chime types. Triple chime, Westminster only, bell strike, bim bam or gong strike.
If the clock has three places to wind with the key it is a quarterly chime unit. This means it is either Triple chime or Westminster only. In other words every 15 minutes it will progressively play part of the song. At the top of the hour it will play the complete song then strike out the hours.
Wall Clocks
Wall clock kits may be spring driven or weight driven. There are more spring driven wall clocks in the world than weight driven. The weights are not light and it is a lot for a wall to hold.
So fastening it well is very important. The movement can have a pendulum or no pendulum but of course the pendulum is most popular. When a mechanical clock does not have a pendulum it has a balance wheel instead. This is a floating and rocking wheel on the top of the movement and operates more like a watch balance.
Mechanical Clock Kit Styles – Granddaughter or Grandmother Clocks
Typically, granddaughters are spring driven with no weights.
The grandmothers are usually chain driven. The chiming units have three weights. Any other strike style has two weights. It is a shorter clock overall than a grandfather clock.
Grandfather Clock Kits
Typically cable driven with three weights and triple chimes.
This means the weights will hang on cables instead of chains, and plays choice of three songs. However it is not always triple chime because some are Westminster only. This is the largest and tallest of the floor clocks.
Chime Types
All of the above mechanical clock kit styles, in the past, have been made with every chime type. In other words there are all these various ways to make the clock play a song or make a noise.
There is the quarterly sounds that play a tune ever quarter hour, the most common of the songs is Westminster. Or there is the triple chime that includes Westminster, St. Michaels, or Whittington.
As for the other noise makers, we call them strike clocks because they only strike out the hours and usually bong once on the half hour. These include Gong strike (coil gong on the back or below the movement), Bell strike, or Bim Bam (sounds like its name, on two or three strike rods).
Order Your Clock kit before building the clock case
It is important to order the clock kit before building the clock case. It’s possible the kit will not fit if the case is built before getting the mechanical clock kit.
Although it may seem counterintuitive, it is more common than you might think. To put a lot of effort into building a luxury case only to realize that the necessary components do not fit inside. It is advisable to purchase the clock kit first to avoid this frustration and potential financial loss, . This will allow you to ensure that all the components fit properly before investing time and resources into the case.
Why order a clock kit before building
To find or adapt a clock kit to the case is very difficult. The ideal dial or other parts may not exist in the size that the case requires.
Moreover, measurements need to be correct for the clock kit to fit into the case.
Always order the Mechanical Clock Kit before building the case. Having the clock kit set up on a stand while working on the case is ideal.
Naturally, it will be easy to measure the various parts of the clock kit such as the pendulum swing and dial. Having the luxury of the components being in the air makes it much easier to measure and is a wise decision.
Not all clocks are made
Many sizes of antique clocks dials are not made anymore. Grandfather clocks back in the day had large Clock dials with ships on them.
They most certainly are gorgeous but try to find another one like it. These are no longer available. This is the case with many others as well. This is yet another reason to buy the clock kit before building the case.
The winding arbor holes will need to be done, if a dial can be found. This way it will have a hole to put the key or crank into. Chain driven clocks are the only style that does not need winding holes in the dial.
Alternate kit component availability
Clockworks offers a large variety of clock movements. However, when it comes to some components resources can get slim. This is why it is important to buy the clock kit before building the case.
Clock dials are the hardest because there are so many shapes, sizes, and options available. Examples include round dials, square, hump top with no moon, and moon dials.
Summary
To sum up this topic on clock kits. It is wise to get the Mechanical Clock Kit before building the clock case. The best thing to do is set up the movement kit in the workshop. This way you can visualize the size prior to installation.
So, do not build a beautiful case before buying components for it. Purchasing all of the components first will give you the opportunity to measure them and ensure they will fit in the case. This will help you avoid the disappointment of designing a case that cannot accommodate your components.
Mounting the Gong
Gong-Strike Wall Clock Kit Instructions begins with the gong installation. The coil gong mounts in the back of the clock case first before the movement. The strike hammer is on the back of the movement.
It adjusts with the wire that the hammer head is on. The hammer on the movement gets its final adjustment by bending the wire the hammer is on.
The destination where the hammer should strike is in the center of the round gong, on the flat portion. This is where it should make contact. When the hammer is at rest, it should be about 1/8 inch away from the gong wire.
There needs to be a space between the hammer and the gong wire so the hammer will make a crisp gong sound without double hitting, thudding, or missing the gong completely.
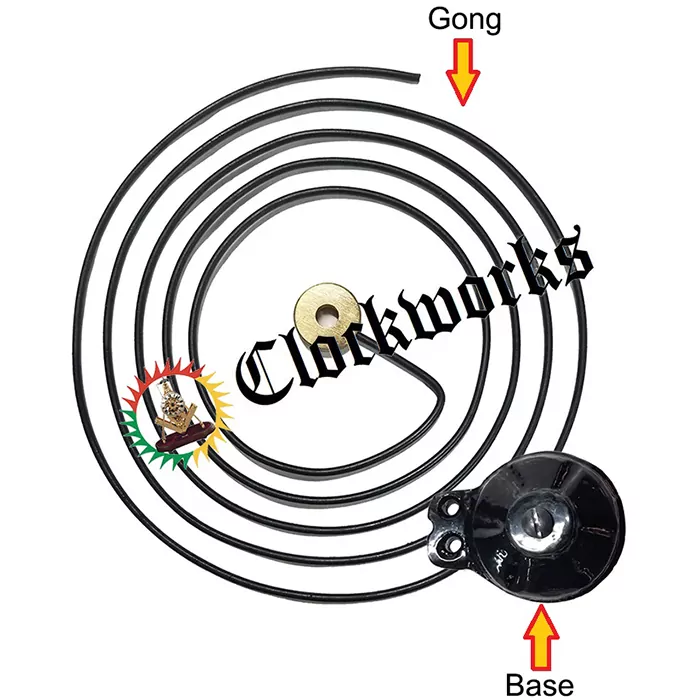
The gong comes with a small metal mounting base. After the base installation, the gong wire is next. The base has a mounting screw that is already in the base’s center. Take the screw off the base, put the gong wire on it, then screw it back together.
Before tightening it up too much, position the gong wire to its approximate position and then tighten it. Approximate position because as previously mentioned, the hammer wire on the movement is what will be the final adjustment.

Gong-Strike Wall Clock Kit Instructions – Mounting the Dial
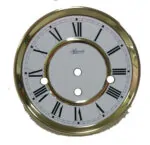
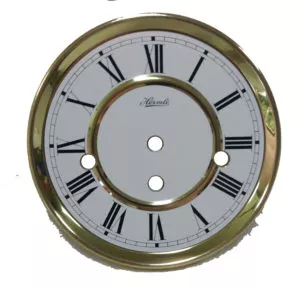
The dial on this kit is a simple white round dial with gold trim and Arabic numerals. We drill the dial for the winding arbor configuration of the movement. This is done so the clock can be wound up with the key.
Attach the dial to a thin board by drilling holes and using some brass finishing nails, or screws, to adhere it to the board. Alternately, epoxy will also work to attach it to the board. Position the dial so the hand shaft itself and the winding posts align with the dial holes.

Gong-Strike Wall Clock Kit Instructions – Installing the Hands
After mounting the dial, it is time to put the hands on the clock. First, install the hour hand. It is a friction fit so twist and push down toward the dial at the same time. The more the hour hand pushes down, the tighter the fit will be because the post is tapers.
Fairly snug but not touching the dial or the minute hand. The hour hand, the dial, and the minute hand should all be parallel with each other. They cannot hit each other during any part of their rotation.
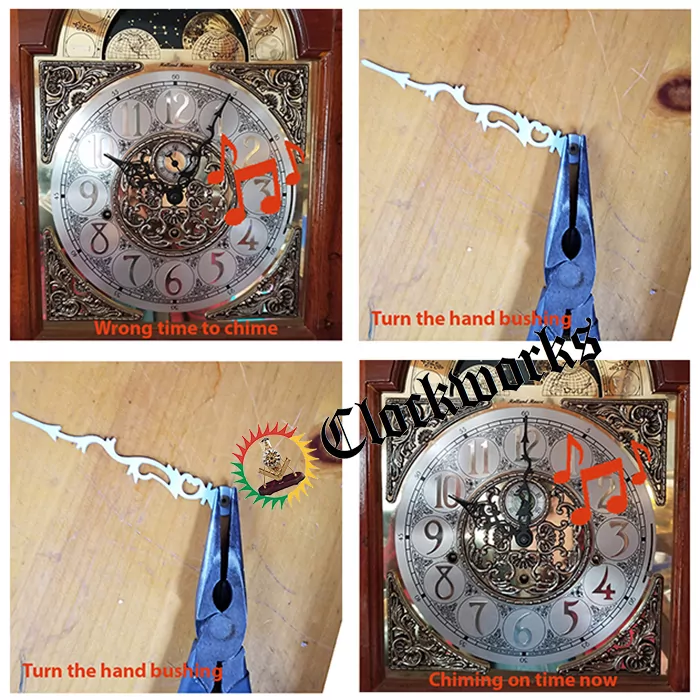
Hands for modern German units have a center mount in the minute hand that rotates. If the clock does not strike exactly on the hour or the quarters like it should, follow the following steps. To correct this issue, take the minute hand off of the clock and turn it over.
With a pair of needle nose pliers, rotate the center mounting bushing a little bit. Hold the minute hand in one hand, the needle nose pliers in the other while grabbing and spinning this center hand bushing.
Gong-Strike Wall Clock Kit Instructions – Hanging the Pendulum
The three components are the suspension spring at the very top, the leader it hangs on, and then the pendulum length all the way down to the very bottom of the pendulum rating nut threads.
The movement will arrive with the the suspension spring already in place. However, the leader that hangs on it may not be. Put on as follows: Take the set screw out of the suspension post to release the suspension spring and then lower it some. When lowering the spring, hook on the leader.
At the same time, the leader should engage with the crutch that swings back and forth on the back of the movement. Goal is to have the leader in the center of the crutch that swings it, hooking up the top to the suspension.
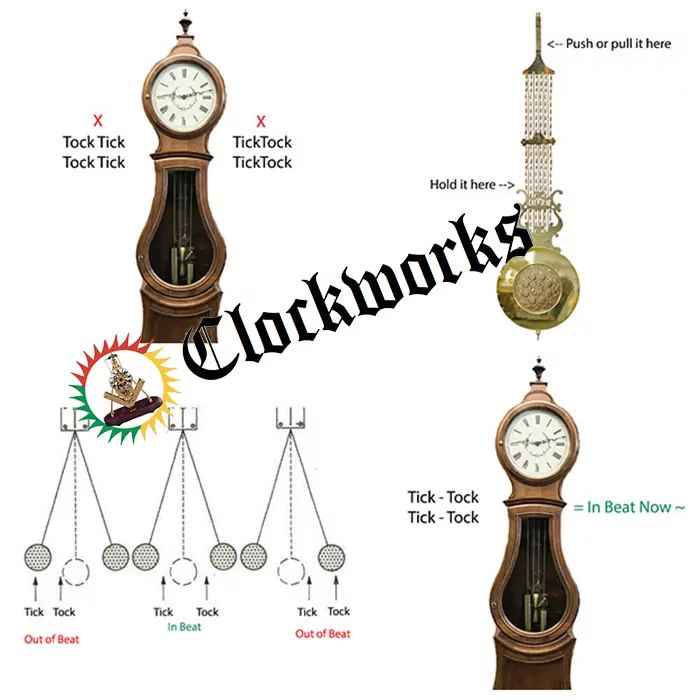
Once you attach the leader to the suspension, bring the two part assembly back up to where it should be. Reinstall the thumb screw that holds the suspension spring, and now also the leader. Hang the pendulum onto the bottom of the leader and put it in beat. It will not run if it is not put into beat, this is easy to do.
Gong-Strike Wall Clock Kit Instructions – Why put a clock in beat
Every pendulum clock needs to be put into beat to operate. If the clock is not put into beat it will run for 5 minutes to 12 hours and then stop every time.
A common issue with mechanical clocks is that it stops working after moving it. This is usually from someone moving the clock without taking the pendulum off and this puts the clock out of beat.
Out of beat is a term in the clock repair world that basically means the clock is going tock-tick, tock-tick instead of tick – tock – tick – tock. The easy fix is by tilting the clock and putting a shim under one side.
This can temporarily correct the problem and the clock runs fine. This method, however, is not as good as correcting the beat and having the clock run when it is truly straight and level.
Adjust the beat by pushing the top of the pendulum left or right as it hangs in its clock case. Hold a lower portion of the pendulum with the left hand as pushing the top of the pendulum left or right with the right hand. Feel the freedom in the pendulum to move left or right.
With some resistance at the sides at the end of the left or right travel. The is changing the beat of the clock when going beyond this resistance and therefore changing the place of the freedom area. Do not worry about breaking the clock there is nothing to break when going left or right.
Timing
The pendulum is responsible for all the timekeeping of the movement. There is a rating nut on the bottom of the pendulum that turns to get the time perfect. Timing a clock takes some time and patience to get perfect and adjust it a few times to get it right.
When turning this nut, it is either raising or lowering the round bob at the bottom of the pendulum. This positioning is what speeds or slows time. Turning the nut to the right to raise the bob, time will go faster. Turn it the opposite way to slow it down.

This concludes the Gong-Strike Wall Clock Kit Instructions.
How to install a spring driven clock movement
Westminster Spring-Driven Clock-Kit Installation
These are the installation instructions for a Westminster spring-driven clock-kit from Clockworks.com.Please be sure to hold off on building the clock case until the movement arrives and is set up in a test environment. This way measuring things can be done in the real world and everything will fit perfectly.
The following is the mounting method for each component for the Westminster spring-driven clock-kit. Please complete them in the order that they are in the list. In other words, the following is the sequential order in which to install these parts.
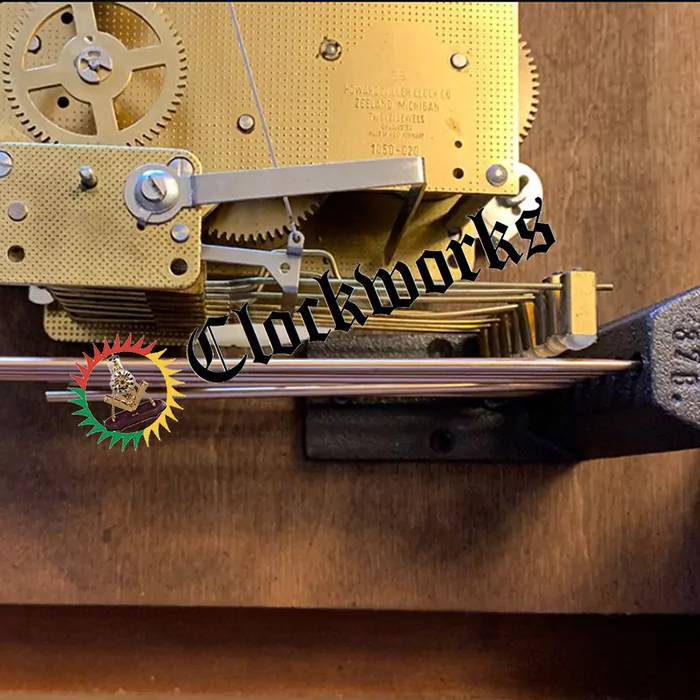
Mounting the Chime Block
First, the chime block will mount to the bottom of the clock case. Of course, the hardware for this comes with the chime block.
It has 5 chime rods that are mounted, tuned with an overall length of about 7 1/2 inches through the block. Next, drill two holes in the bottom of the clock case to mount it in the Westminster spring-driven clock-kit.
Use a flat screwdriver for the bolts and washers to mount the block from underneath the clock case. Moreover, the washers keep the bolts from going through the wood and they thread right into the chime block.
To help position the height, mount a spacer block on the inside of the clock case where the chime block will mount. This is optional but can help. Nevertheless, keep in mind that the chime block positioning only has to be approximate.
Obviously, the hammers on the movement are meant to be bent into the final position.
What this means is it does not have to be dead on. Pretty close to where the hammers on the movement will be is good enough.
Position it so the tops of the hammer heads are about 1/8 inch down from the block that the chime rods come out of.
The final adjustment will come later when bending the hammer wires as to make the head about 1/8 away from the chime rod. This spacing between the head and the rod is so it will not thud or double hit.
Bend each hammer so it sounds good down the line, and a nice song will play when done.
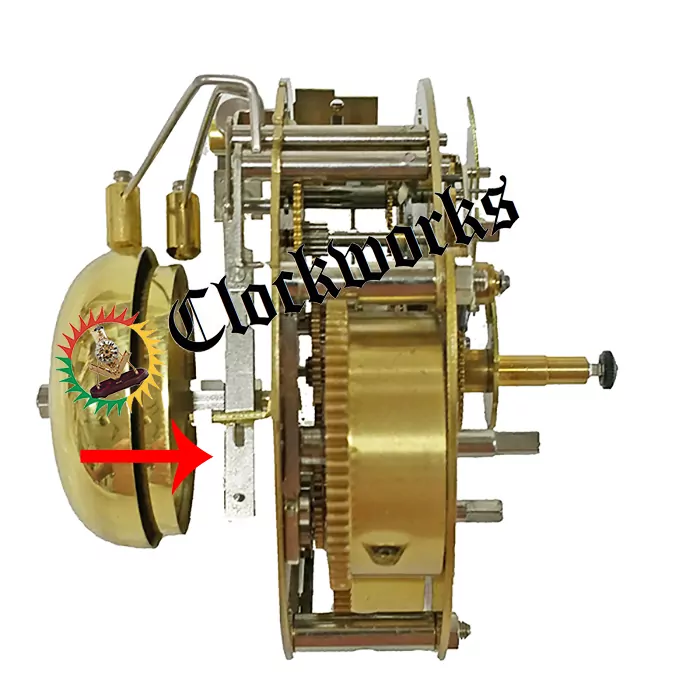
Movement Installation
Altogether, it plays 4/4 Westminster chimes that sounds each quarter hour and strikes the full hour. The movement comes from the factory with oil and ready for installation.
Moreover, it includes the leader, the suspension spring, and the hand nut.
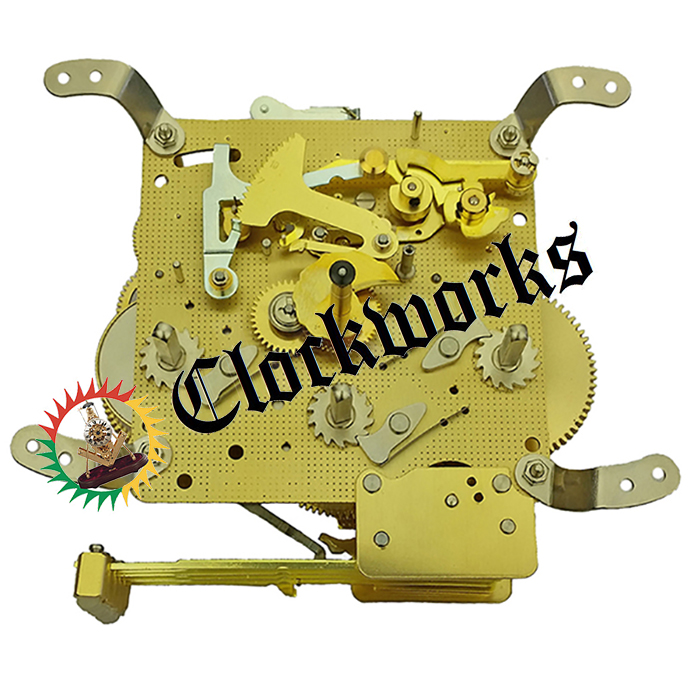
Subsequently, it has two square outer plates made of brass with the puzzle of gearing between them, and then it has the 5 hammers on the bottom for the westminster chime.
This is an 8 day key wound movement with 100 mm plate width and height. The Hand shaft is 33.2 mm from the front plate all the way out.
This is a front mount movement, however this can change very easily if a custom design is in need.
The mounts can go on the back of the movement instead, if the set up allows for the pendulum to still swing. The mounts are a dog ear shape with holes in them.
Use some small wood screws to secure the movement. Generally speaking, this movement is sold as a front mount intention. Drill 4 or 5 inch holes in the wood on the front of the case.
Of course, the movement screws to the back side of the board with the hole in it, and the dial mounts on the front.

The Clock Dial
Westminster Spring-Driven Clock-Kit Installation: If your clock dial has no ‘feet’ for mounting
The dial is a light weight metal dial with gold trim.
The width of the dial is 6 inches and has a 5 inch time track. The time track is the ring just outside the numerals.
Mount this by drilling small holes in the dial trim and using small nails or wood screws to secure it. Then, align the winding arbors and the hand shaft with the holes in the clock face.
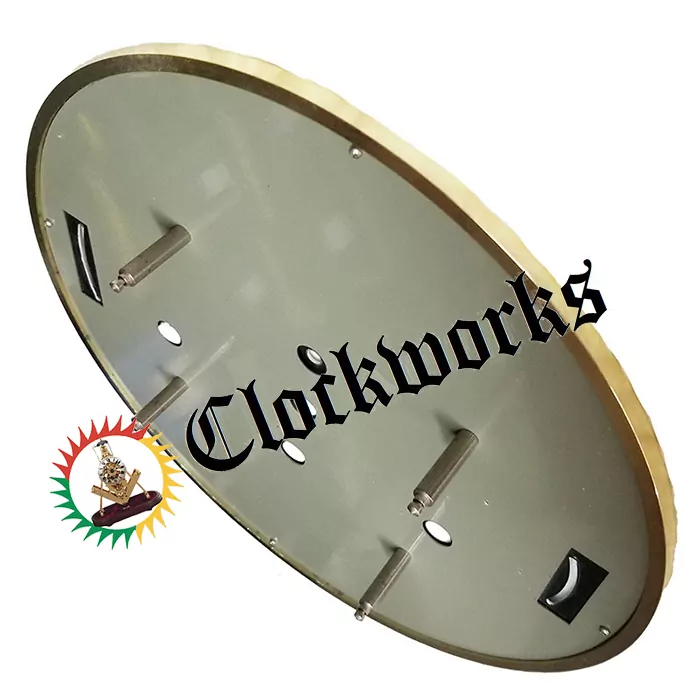
Westminster Spring-Driven Clock-Kit Installation: If your clock dial has ‘feet’ for mounting
This is a light weight metal dial with gold trim. The width of the dial is 6 inches and has a 5 inch time track. The time track is the ring just outside the numerals.
This is mounts by using the dial blind plate. This is the backing of the dial with the four feet. The feet of the blind plate will lock into the front plate of the clock movement itself.
This way the dial has the appearance of hanging in the air instead of a board mount. Secure the feet of the blind plate to the front plate of the movement by using taper pines to lock the feet in.
Clock Hand Mounting
Westminster Spring-Driven Clock-Kits have an hour hand that has a round hole and is only a friction fit onto the post. It moves forward or backward to adjust the time.
The minute hand secures with the minute hand nut.
If the clock ends up chiming at other times than the quarters, do the following. Take the minute hand off of the clock. This is the longer of the two hands. With this minute hand off of the clock, turn it upside down.
Notice it has a square hole where it attaches to the clock. Well this square hole is in a bushing that will rotate WITHIN the minute hand itself. So just use needle nose pliers to turn this bushing so the square in the bushing rotates.
Then put the hand back on the clock and see if it points to where it chimed. Then set to time by turning the hands backward or forward.

Pendulum Installation
Grid R and A style pendulum with a hook top. At the bottom of the pendulum is the rating assembly.
A rating assembly is the nut and threads that hold the pendulum bob on.
As the name rating nut and threads indicates, its function is to adjust the time keeping of the clock. If you turn the nut at the bottom as to raise the pendulum bob a little, this will speed up time. Do the reverse for slowing of time.
This concludes the Westminster Spring-Driven Clock-Kit Installation Instructions
Mechanical Wall Clock Kit
This quality Mechanical Wall Clock Kit has a German made spring driven clock movement will run 8 days on a single wind. The movement has 5 hammers below. So this means it will play the progressive Westminster melody on the quarter hours.
The kit comes with the movement, chime block and rods, the dial, hands and a key. This is a complete clock with out the wood case!
- Westminster
- Spring Driven
- 6 inch overall dial diameter
- Grid pendulum 12′ tip to tip with R/A bob
- Bottom 5 rod chimeblock
- German made movement
- 2-year warranty
The Clock Movement
Plays 4/4 Westminster chimes, sounds each quarter hour, and strikes the full hour. Also, it comes with factory oil in key wear areas. So it is ready for installation. It includes the leader, the suspension spring, and the hand nut.
Another feature is two square outer plates made of brass with the puzzle of gearing between them. Then it has the 5 hammers on the bottom for the Westminster chime. This is a German made 8 day key wound movement made by the Hermle Clock company.
Movement Installation
This is a front mount movement, however this can change very easily if you want a custom design. Instead, the mounts can go on the back of the movement, if the set up allows for the pendulum to still swing. The mounts have a dog ear shape with holes in them.
Simply acquire some small Phillips head wood screws to install the movement. This movement is sold as a front mount intention. In addition, the case will need a 4 or 5 inch hole put into the wood on the front of the case.
The movement screws to the back side of the board with the hole in it. Then the dial mounts on the front of it. The kit will come with instructions for everything. As always, we are here to guide you if you get have trouble.
| Weight | 2 lbs |
|---|
- German Movement
- Westminster Chime
- Spring Driven
- White Roman Dial
- Grid Pendulum
- Factory Oiled
- 2-year warranty
- German Movement
- Westminster Chime
- Spring Driven
- White Roman Dial
- Grid Pendulum
- Factory Oiled
- 2-year warranty
You may also like…


I have a Schoolhouse Regulator Wall Clock that belonged to my father. It has quit working. The dial reads D&A, pendulum R&A. The back of the face is stamped Made in Korea C.S. Th back of the moment shows 3 5s in a clover & on other side Shanghai’s. Is the WMKIT1 a suitable replacement?
Yes it sounds like a good kit for it, be sure fits with the measurements is all
James Stoudenmire
40yr Clockmaker
Author of Clockworks.com
One other question on WMKIT1:
Does the clock face have a glass hinged cover?
Thank you,
Scott
Hello,
I am interested in the WMKIT1 and have some questions:
Thank you,
Scott
1 Hermle
2 no
3 No, comes in a kit with the pendulum described.
James Stoudenmire
40yr Clockmaker
Author of Clockworks.com
I’m interested in the WMKIT1 to replace the movement in an existing clock, which no longer works. The Westminster chime first stopped working correctly, then the movement stopped working altogether a couple years later. The original is approximately 30 years old and I know little about the movement. It has no markings that I can see other than the words Made in Germany on the face. The chime can be silenced with a lever on the side. The WMKIT1 dimensions and pendulum swing are very close to to mine, though the dial on my clock is 8”. I’d like something similarly sized because the box was built around the clock. I’m wondering if the WMKIT1 is available with a larger dial (and longer hands if my existing ones won’t fit the new movement. I can provide pics of my clock if that would help
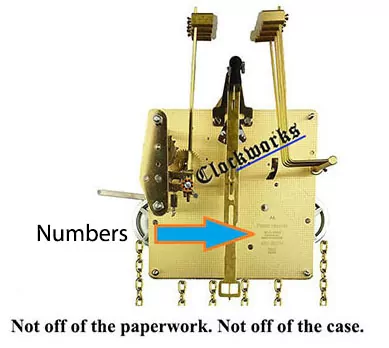
What are the numbers off of the back plate of the clock movement itself? If it is hard to get to, usually you can stick a cell phone up behind the movement and get a picture of the numbers. Or through the side access panel if there is one.
James Stoudenmire
30yr Clockmaker
Author of Clockworks.com
Can the 6 inch dial that comes with WMKIT1 be replaced by something closer to 7-7/8 inches?
We can build that same kit with the 351-020 unit in stead, and use this 7 7/8 dial, has feet to lock into the movement, made in Germany, excellent quality
https://www.clockworks.com/product/7-7-8200mm-round-dial-for-351-830-351-850
The price would be much higher however, and so would the quality of both the movement and the dial.
Or maybe live with the 7 inch dial
https://www.clockworks.com/product/7inch-178mm-round-arabic-dial
and get it drilled for the movement so you can wind it
https://www.clockworks.com/product/custom-dial-drilling-service
Price would be similar to what it is now, however will be no feet to lock into the movement with the dial. The dial would need to be attached to the wood case instead
James Stoudenmire
30yr Clockmaker
Author of Clockworks.com
What about the 7-1/4 inch dial that comes with WMKIT12? Does that work with Hermle 341-020 ?
Hello, apologise for the delay, had to check stock on those dials. Yes we can certainly do that dial swap. Would you like for us to put together a custom order checkout for you with this modification?
James Stoudenmire
30yr Clockmaker
Author of Clockworks.com
Yes, I would like the WMKIT1, but with the larger dial and hardware for a rear mount. Thanks.
Ok we shall prepare a check out link and email with it
Thank you
James Stoudenmire
30yr Clockmaker
Author of Clockworks.com
Can I swap out a larger dial for the Mechanical Wall Clock Kit WMKIT1, like something closer to 7-7/8 inches?
What model of Hermle clock movement is used in the WMKIT1?
341-020/45
James Stoudenmire
30yr Clockmaker
Author of Clockworks.com
I am looking for a mechanical wall clock kit. I have an antique clock case that I have no movement or face at all. The interior dimensions of the case are 5”deep, 12 1/4”wide and 34”tall. What would be the most economical way to retrofit a movement for this case?
This is best discussed with pictures of the clock. Please email pictures to clockworks@clockworks.com with this same note
James Stoudenmire
30yr Clockmaker
Author of Clockworks.com
I recently purchased this movement kit (WMKIT1).
If I try and mount the movement to the back of the board, which is 1/4″ thick and has a 4 3/4″ hole, and the dial/face to the front side of the board, the post for the hands does not protrude far enough through the face to install the hands. Also, the posts on the back of the face are not long enough to reach the movement.
What am I doing wrong?
Is there a picture that shows how the movement and face are to be mounted to the board for a front mount?
Hi,
IT just needs a thinner board. If the board is very thin it may require a flat head low profile bolt and nut, the bolt would go through the board and it would have nuts on the back where the movement is. This would then be covered by the dial in the front, so the bolt heads are not visible.
James Stoudenmire
30yr Clockmaker
Author of Clockworks.com
You helped my father so much, big thanks to everyone.
I have the WMKIT1 and am trying to figure out how to silence the chime—it appears there are parts to do this but no instructions on how to do it.
That kit contains a 341-020 movement, that does not have the ability to shut off the chimes with a lever.
I’m looking for a project to build a clock I made Cabinets so Woodworking is easy for me. Possibly a Clock I could put on top of my dresser or mantle
Can I see a pic of the type of clock you would like to build, or something close to it? Please email clockworks@clockworks.com
Can this be hung on the wall without a case. ie. as a skeleton clock?
Yes, it can be mounted from either the front of the movement with these https://www.clockworks.com/product/clock-movement-mounts-dog-ear-style Or bottom with these https://www.clockworks.com/product/clock-movement-seat-board-screws Or back with these https://www.clockworks.com/product/extended-post-style-clock-mounts-for-german-units
James
Many Thanks !
James and Donna Stoudenmire http://www.clockworks.com 124 Goss Hill = UPS Mailing PO Box 339 = USPS Mailing Huntington, MA 01050 USA clockworks@clockworks.com
Virus-free.
http://www.avg.com
Virus-free.
http://www.avg.com
I want to mount this on the wall without a case. Can that be done?
thanks for the response
Yes if a seat board is created to sit on the wall this movement can mount to it. Maybe too dusty though best to have some sort of cover over the movement area, even if its lucite
Many Thanks !
James and Donna Stoudenmire http://www.clockworks.com 124 Goss Hill = UPS Mailing PO Box 339 = USPS Mailing Huntington, MA 01050 USA clockworks@clockworks.com
Virus-free.
http://www.avg.com
Virus-free.
http://www.avg.com
what is the model # & maker of the movement ?
Hermle 341-020 45cm is the clock movement, as seen at this link https://www.clockworks.com/product/new-341-020-clock-movement-by-hermle
Hi. First can you please give me the cost of shipping to New Zealand ?
I have an existing wooden case 19.5 in high x 7.5 in wide x 4.5 in deep with an old back mounted movement. I would like to replace this with your WM Kit-1 Hermle 341-020 45cm kit. Do you think this is possible ?
Many thanks, Mike
Hi
Shipping is expensive to NZ but if you would like a quote please email your name and address to clockworks@clockworks.com Seems the space is fine for that clock kit, will be a nice fit https://www.clockworks.com/product/mechanical-wall-clock-kit-wmkit01 It is true and your correct that the clock kit movement is the Hermle 341-020 45cm as seen at this link https://www.clockworks.com/product/new-341-020-clock-movement-by-hermle
James
Many Thanks !
James and Donna Stoudenmire http://www.clockworks.com 124 Goss Hill = UPS Mailing PO Box 339 = USPS Mailing Huntington, MA 01050 USA clockworks@clockworks.com
Virus-free.
http://www.avg.com
Virus-free.
http://www.avg.com
I am interested in buying 15 of these movements. It is my understanding that the face or dial comes with the movement and is part of the total price. I ordered some years ago from a different vendor and was surprised and disappointed that they did not include the dial. What good was that to me. Had to buy an extra dial. Do not want to do again as it was difficult to get the right dial.
Also do you have a set of plans for this clock movement. I want to build a wall clock that I can give away as a gift. I am just a hobby guy that wants to give friends and family things that I make. I am not a business and will not well them. If you have plans that are full page plans, not 8 1/2 by 11 plans I would really appreciate it.
I look forward to your response.
Thanks
Scott Lorimer
Comes with the dial yes. Do not have the plans no.
In stock at this time, I can provide a bulk discount.
James
Hello, I’m hoping you can help me out. Is the above clock kit available in a rear mount option? I have a glassed faced clock case that’s 156 years old and I’d like to keep it. However, the current clock mechanism slides onto the brass bracket. Thank you.
we can put some brackets in with it that will make it possible to mount to the back of the case. this is possible, however you will need to make some modifications to make things fit just right. –Bob
Many Thanks !
James and Donna Stoudenmire http://www.clockworks.com 124 Goss Hill = UPS Mailing PO Box 339 = USPS Mailing Huntington, MA 01050 USA clockworks@clockworks.com
Virus-free.
http://www.avg.com
Virus-free.
http://www.avg.com