
Blog


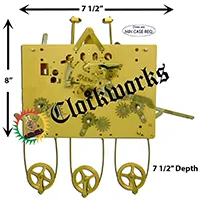
351-051 Hermle Clock Movement
Hermle clocks are renowned for their precision craftsmanship and intricate mechanisms. Whether your clock is a wall/mantel clock, or grandfather clock, the winding process is similar. Hermle clocks typically feature key-wound movements, requiring periodic winding to function correctly.
Before you start, identify the winding mechanism of your clock. Most Hermle clocks have one to three winding points:
- One winding point: Powers both the clock and chime.
- Two winding points: Separate windings for the timekeeping and chiming functions.
- Three winding points: Separate windings for the timekeeping, chiming, and hourly strike mechanisms.
Understanding the winding system is essential to avoid over-winding or missing any winding points, both of which can impact your clock’s functionality.
Step-by-Step Guide to Winding a Hermle Clock
1. Locate the Winding Points
Open your clock’s front panel to reveal the dial and locate the winding points. They are usually positioned on the clock face and are easy to identify as small holes designed to fit a winding key. Check your clock’s manual if you are unsure about the exact location.
2. Prepare the Winding Key
Ensure you have the correct winding key for your Hermle clock. At Clockworks, Inc., we offer a range of high-quality clock winding keys compatible with Hermle models. If your key is lost or damaged, you can find replacements on our website. Using the correct key is crucial to avoid damaging the winding points or internal mechanisms.
3. Insert the Key into the Winding Point
Insert the key into one of the winding points, ensuring it fits snugly. Avoid forcing the key into the slot. A loose or improper fit could indicate the wrong key or damage to the winding point.
4. Turn the Key
- Turn the key clockwise for most Hermle clocks. If you feel resistance, stop immediately.
5. Repeat for All Winding Points
If your clock has multiple winding points, repeat the process for each one. Be sure to fully wind all points, as leaving one partially wound can disrupt the clock’s chiming or striking mechanisms.
6. Check the Clock’s Operation
After winding, observe the clock to ensure the pendulum swings and the chime or strike functions as intended. If anything appears irregular, your clock may require cleaning, oiling, or repair.

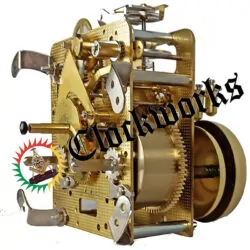
351-030 Hermle clock movement
Tools to Enhance Your Hermle Clock Maintenance
At Clockworks, Inc., we provide a wide array of tools and products to help maintain your Hermle clock:
- Clock Cleaning Solution: Regular cleaning removes dirt and dust from your clock’s delicate mechanisms, ensuring smooth operation. A clean clock runs more efficiently and is less prone to mechanical issues.
- Clock Oilers: Proper lubrication minimizes wear and tear on moving parts, extending your clock’s lifespan. Our easy-to-use oilers allow precise application of clock oil to keep your Hermle clock functioning flawlessly.
- Clock Repair Services: If your Hermle clock requires professional attention, our team can clean, oil, and repair clocks of any age or type. Entrust your timepiece to experts who understand its intricate design.
These tools and services not only simplify the maintenance process but also ensure your clock remains a centerpiece of your home.
Common Issues and Troubleshooting
Even with regular winding, Hermle clocks can develop issues over time. Addressing these problems promptly helps prevent long-term damage. Here are some common problems:
– The Clock Stops Running
If your clock stops running, check to ensure it’s fully wound. Insufficient winding is often the culprit. If the issue persists, dirt buildup or inadequate lubrication could be the cause.
– The Chime or Strike Malfunctions
When the chime or strike function malfunctions, first ensure all winding points are fully wound. Misaligned gears or dirt buildup may also cause these issues.
1161-850 Hermle Clock Movement
Why Choose Clockworks, Inc.?
At Clockworks, Inc., we are passionate about helping clock enthusiasts maintain and enjoy their timepieces. Whether you’re a seasoned collector or a beginner, we provide everything you need to keep your Hermle clock in top condition. With decades of experience and a commitment to quality, we are your go-to resource for all things clock-related.
Get Expert Assistance
Winding your Hermle clock correctly ensures its smooth operation and protects it from unnecessary wear. If you encounter any issues or need expert advice, our team at Clockworks, Inc. is here to help. Visit our website, clockworks.com, or contact us at [email protected] for additional support.
Enjoy the timeless beauty and precision of your Hermle clock with confidence, knowing you have the best resources at your fingertips.
141-070 Hermle Clock Movement


Hi. I have a Hermle mantle clock, but it gains a couple of minutes each week. Is it able to be better regulated?
Thanks
What are the numbers off of the back plate of the clock movement itself? If it is hard to get to, usually you can stick a cell phone up behind the movement and get a picture of the numbers. Or through the side access panel if there is one.
Not off the paper work, not off the wooden case, but the movement stamp itself
James Stoudenmire
40yr Clockmaker
Author of Clockworks.com
Thanks James. The Numbers are 340-020A
Timing a balance clock movement
Balance Clock Movement Timing is done fairly easy. There are three types of clock balance movement styles post 1950. This section is for those balance units that do not have a platform escapement. The platform escapement can be read about in another section. These notes are only for the larger balance wheel in the top center of the clock movement.
For example, movements in the Urgos 6/ series and many of the Hermle clock movements. Hermle movements such as 340-020 and 350-020. Out of these, two styles, the old style and then the new style.
Use of the old style was all through the 70’s and 80’s and 90’s. Around this time there was a switch to the new style on the Hermle units. By this time the Urgos units were out of production.
The old style
The old style is one with a round spring that goes up and down (Vertical). It goes in a circle around the center arbor of the balance wheel. In this style there is a slide arm with a tiny weight on the balance wheel itself. There is a + and – on the wheel. To speed up time go towards the plus sign.
However this style is not always easy to regulate and can be very hard to get it perfect. The factory has special devices to make it perfect. However it’s not that easy on the customer end with this style balance. For this reason it has been improved upon during future manufacturing.
If the old style balance then the clock movement has some age to it. If this is the situation it is just best to replace the unit with the new one. Clockworks offers the movement brand new with the new style balance for less than the cost of a cleaning.
The clock movement has lasted 25 years or more. In theory the new unit should last more than this with the improved aspects.
The new style
The non pendulum units offered on this page all have the new and improved balance assemblies. Despite the change on the balance, these units are a direct fit and will install in the clock case the exact same way as the old unit.
If the numbers match from the old unit to the numbers offered on this page, than the movement will be the exact same. It will be the same as it is now but brand new and with the improved balance. The improved upon balance units have a different kind of hairspring (Horizontal). It will also have a screw to regulate it rather than a slider arm.
The regulator screw is on the back of the movement near the balance. There is a + and – sign next to it meaning fast or slow. If the clock needs to be faster to keep time then the screw would be turned to the plus and opposite for slowing time. The factory times the balance movement before the new movement ships.
The movement has a slider arm on the threaded portion of the timing adjustment screw. This arm pulls or pushes the horizontal hair spring and makes the clock run faster or slower. When the movement leaves the factory this arm is in the center of that threaded rod and is timed while the arm is at that location.
During shipping it is possible for this arm to jump out of its center position and, in turn, make the timing out of whack. The solution to this is to first just lift that timing arm with fingers and move it to the center of the threads again. This is where timing begins.
After it is in the center of the threads it will be pretty close in timing and only will need fine adjustment with the screw, moving it too the plus sign for faster, minus sign for slower.
James Stoudenmire
40yr Clockmaker
Author of Clockworks.com